


- Use Headings to Format Text
- Format Accessible Lists
- Use Accessible Color Contrast
- Write Accessible Link Text
- Create Accessible Tables
- Use Alternative Text (alt text) for all Images
- Use Accessible Media
Overview
In order to meet the expanded Title II of the ADA, the UMN community is working to make our digital content accessible. For those using Canvas, the RCE provides tools to create accessible Pages, Announcements, Discussions, Assignments and Quizzes throughout a course site. In fact, the RCE provides ways to use all 7 Core Skills of Accessibility to course content so that you can revise existing course content and continue forward making new course content accessible.

Read below for a brief overview of each of the 7 Core Skills and access resources for how to apply each skill in the Canvas RCE.
7 Core Skills of Digital Accessibility
Skill 1: Use Headings to Format Text
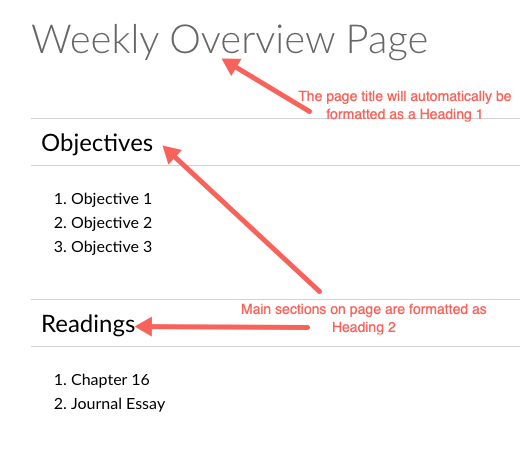
Using headings to structure your course content makes it accessible for those using screen readers. It also improves the scan-ability of a page for everyone in your course site. To properly format those headings, use the RCE Paragraph drop-down menu to apply the heading style (block) to topics and subtopics in your page content.

For accessibility purposes, Heading 1 should only be used once on a page, and Canvas uses it for the page title. Therefore, the first heading block (style) available for you to use in Canvas is Heading 2. Think through the main organizational pattern of your material. For assignments, you may want to use the same three headings to orient all students to what’s on the page. Use Heading 3 for your subtopics and Heading 4 for your subtopics. The bulk of your text should use the Paragraph heading.
Resources
- Learn about Accessible Headings
- Use Accessible Headings in the Rich Content Editor (see section “Change Texts Style”)
Skill 2: Format Accessible Lists
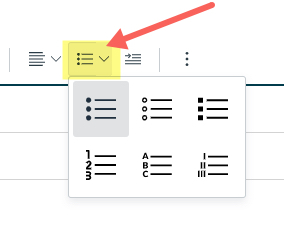
You can make your content easier to scan by using lists. Breaking up content into lists of ideas or instructions helps all learners easily follow the content on the page. The RCE Ordered and Unordered Lists menu allows you to format content with bullet points or numbers.
When to use bullets or numbers
- Use numbers to outline steps in a process or denote the order of importance.
- Use bullet points to separate ideas into more readable chunks of text where order is not important.
- Use the RCE’s Increase Indent button to organize ideas or instructions to improve content readability.

Resources
- Learn About Accessible Lists
- Create Accessible Lists in the RCE (See section “Create Bulleted or Numbered List”)
Skill 3: Use Accessible Color Contrast
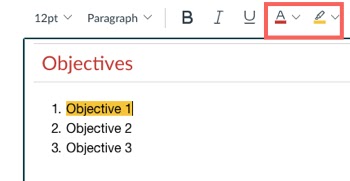
The RCE allows you to change the color of text and to highlight the text with a color.
Although color can be a nice addition to the content of your course, there are a few principles to keep in mind when applying color to text:
- Too much color can be distracting. Using less color has more impact than having several different colors of text and highlighting on a page.
- Ensure a strong color contrast between the foreground and background of any elements on the page.
- The built-in accessibility checker in the Canvas RCE checks color contrast for you. We will cover how to use that tool later in this module.
- If you are using color to draw attention to information, always precede it with another indicator (for example, the words “Important:” or “Note:”) to communicate its importance to those people using screen readers.
Resources
Skill 4: Write Accessible Link Text
The RCE includes several ways to insert links to other course materials or links to external resources. See the following resources for specific steps. No matter what you are linking to, follow these general guidelines:
- Make sure your link text is well-placed to help both sighted people and those using screen readers or other adaptive technology to consume content.
- Avoid linking entire sentences.
- Make sure that the link text is concise, yet with enough context, to show users where the link will take them.
- Do not use words such as “click here,” “linked here,” etc.
- Include an indication of what the resource is--a video or PDF.
Resources
- Learn About Accessible Link Text
- Create hyperlinks to external URLs from the Rich Content Editor
- Create hyperlinks to course, groups, or user files from the Rich Content Editor
- Edit or remove hyperlinks in the Rich Content Editor
Skill 5: Create Accessible Tables
Tables can help organize and display content. Once you have built your table, you must identify the header row to make the table accessible. Designate the row that contains the column labels for your data as the header row. Most of the time it will be the top row of your table.
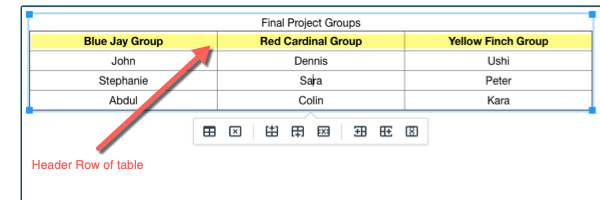
Another way to make the information in your table accessible to all learners is to summarize the table information using the table caption option. See the resources below to learn how to apply a caption to your table.
Resources
Skill 6: Use Alternative Text (alt text) for all Images
The RCE allows you to insert images into the text area to add visual elements to your course content. Alternative text, or "alt text," provides a text equivalent for images, charts, graphs, and more. There are many benefits to having alt text:
- Can be read by assistive technologies. Without alt text, screen reader users cannot know what the image is conveying.
- Can help sighted users understand the content of the image when their browsers fail to display the image.
- Can help English learners gain vocabulary to describe what they see.
- Can help you, the author, make sure that the image you've selected communicates your intended purpose.
Insert alt text whenever you insert an image in the RCE. There are two main ways to insert images, listed in the resources section below. Both options allow you the ability to give an image alt. text. To make sure all images already embedded in your course have alt text, see Manage Alt Text and Display options for Images already Embedded in the Rich Content Editor.
Resources
- Learn how to write Alt Text
- Embed Images from Canvas Course Files into the Rich Content Editor
- Upload and Embed a New Image in the Rich Content Editor
Skill 7: Use Accessible Media
If you have any audio content (MP3s, podcast recordings, interviews) ensure there’s a written transcript to accompany it for people who are d/Deaf or hard of hearing to interact with the content. It also helps everyone search through the content for reference.
Canvas provides a few ways to embed video content using the RCE. We strongly recommend using the Kaltura video integration for the following benefits:
- Ensures an accessible playback tool for students using adaptive technologies.
- Stores video in the MediaSpace cloud which keeps course site file size smaller allowing for faster course load times.
The are 2 main things to remember whenever you use video or multimedia:
- Caption video or provide a transcript.
- This means that you need to read over all automatically provided captions to make sure they are accurate.
- This is for any external videos that you link to (think YouTube, TedX, etc.) or videos you have created.
- Again, we strongly encourage the use of Kaltura which does a great job of providing captions, and provides an easy method to edit your captions to ensure correctness.
- Another point to remember when using multimedia is to give descriptions for highly visible media so that people with visual impairments can also read. This may be providing an audible description of something highly visual. It may also mean giving a written description for the visible learning piece (for example, step-by-step instructions for screencast) that can be accessed by a screen reader.
Resources
- Learn About Accessible Video and Audio
- Find and Edit Kaltura Captions
- Add Media from Kaltura Using the Rich Content Editor
Tools in Canvas to Check Accessibility
RCE Accessibility Checker
Fixing all of these accessibility issues can be overwhelming at first. Think if you had written your entire course content without running a spell or grammar check as you went along. It would take a while to make all of those changes at once!
It’s similar to accessibility review tools. It gets easier if you make the changes while editing things page-by-page. Using the 7 core skills is a great way to help you keep accessibility in mind when you add new content to your Canvas course. And, once you have put in all your content, there is an accessibility checker built into the RCE to help check as you create content. You have to be in edit mode on a page to be able to click on this accessibility icon that appears under the RCE.
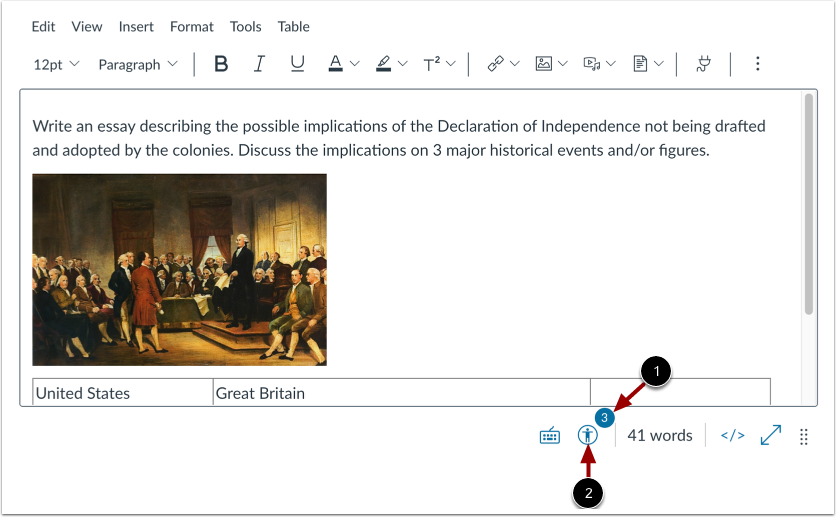
This accessibility checker can check 6 of the 7 accessibility principles we just covered (the 7th one being that it cannot check multimedia for proper captioning or audio descriptions).
UDOIT
In addition to the Canvas accessibility checker within the RCE, a tool called UDOIT can be used in Canvas. It can be selected in the “Check Accessibility with UDOIT” link on the course navigation. This tool scans the entire course for accessibility issues, including link text, heading formatting, color contrast, and more. It provides suggestions on how to make fixes, flags individual issues, and scans for video content and files included within the course. This tool’s ability to scan course files allows it to find accessibility issues beyond the scope of what can be found with the accessibility checker in the RCE. Use this tool to scan your entire course content.
Resources
Learn more about accessibility in Canvas by taking the Digital Accessibility: Create Accessible Canvas Course Sites course.
Contributors
DM Lavoie and Rebecca George-Burrs contributed to the creation and writing of this post.
Like what you read? Subscribe to the Extra Points Google Group for an email notification when the next blog post goes live.